Hirekai/Ridge Gourd peel chutney

Hirekai/ಹೀರೇಕಾಯಿ/Ridge gourd is supposed to contain loads of nutrients. Just like the vegetable,  the skin/peel also has its benefits but we throw it away. Not any more. Here is a nice way to utilize that.

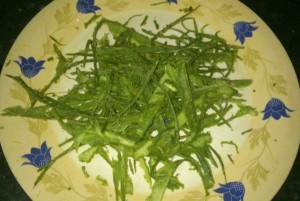
Ridge gourd peel

Ridge gourd peel

Ingredients:

  • Hirekai/Ridge gourd peel – I have taken peels from three medium-sized gourds
  • Garlic – 2-3 pods(optional)
  • Onions – 1/2 small(optional)
  • Dry/desiccated coconut powder – a little
  • White sesame seeds – 1/2 tbsp
  • Jeera – 1/2 tbsp
  • Salt – as per taste
  • Green Chilli – 1 & 1/2
  • Curry leaves
  • Coriander/Cilantro
  • Oil – 1 tbsp – for frying
  • Jaggery/sugar – optional
  • Lemon – 1/2 big
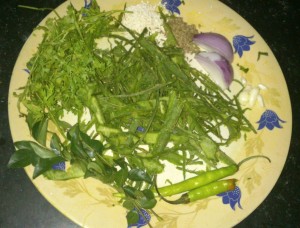
chutney ingredients

chutney ingredients

Method:

  • Heat oil in a kadhai. Add the ridge gourd peel, onion, garlic, curry leaves and coriander and sauté for 7-8 minutes on a medium flame.
  • Towards the end, add all the other ingredients except salt and lemon and take it off the heat.
  • Once the mixture cools down, grind it to a coarse paste along with salt, water and lemon.
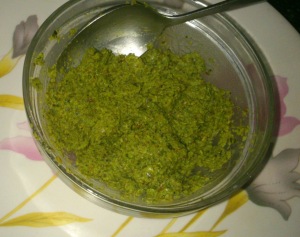
Hirekai Chutney

Hirekai Chutney

  • You can add tempering to the chutney to give it more taste. I haven’t in this case.
  • Also you can add roasted groundnut powder instead of coconut powder. That works beautifully too.

Tasted best with roti of any kind 🙂
Ragi Malt/Ambali

Summer has just started and we are already seeing the Sun shine in full glory. Air-conditioner is no respite in a small town India where power cuts everyday are a norm and not an exception. The best way to beat the heat then is summer foods. The one that tops the list in our family is “Ragi Ambali/ರಾಗಿ ಅಂಬಲಿ” or what is more popularly known as ragi malt. I won’t go into the health benefits of ragi. This gluten-free millet is now known widely among the health freaks and rightly so.

Ragi Malt/Ambali

Ragi Malt/Ambali

This can be served as breakfast or after lunch/dinner or can even act as a meal substitute esp in the afternoons when you don’t feel like eating anything.

Ingredients:

  • Ragi flour/ರಾಗಿ ಹಿಟ್ಟು – 2 tablespoons
  • Water – 1 – 1/2 cups(varies according to how thick or thin you want it to be)
  • Buttermilk – 1 cup(you can even use curd in place of buttermilk)
  • Salt – as required
  • Cilantro – for garnishing
  • Garlic – 3-4 pods
  • Onion – 1/2 small finely chopped
  • Jeera – powdered/crushed

Method:

  • Mix ragi flour in water ensuring no lumps are formed.
  • Simmer the mixture for about 5-7 mins/Till you see the mixture boil. Keep stirring continuously. Also ensure you boil it properly else it tastes like flour while having the drink.
  • Once you see it start boiling, add the salt, garlic and jeera. And take it off the stove once the mixture boils properly.
  • Don’t worry if it is too thick/thin. It can be adjusted to your taste while serving.
  • Once the mixture cools down put it in a refrigerator(optional step but preferred as this is best served when chilled).
  • While serving add the buttermilk/curd and garnish it with cilantro and finely chopped onions. Omit the onions if you don’t like the raw onions.
Ragi Malt_2

Ragi Malt_2

Optional – you can also add some Jowar flour along with ragi flour. Although in this recipe I haven’t added, it is commonly added in North-Karnataka recipes.

Whenever I try introducing ragi to my friends(esp the ones from the North), they run away from it on seeing the colour. But guys trust me, it tastes great and this is one occasion where you need to see content over colour. It isn’t fair but lovely for sure. 🙂

Green Peas dal/Matar Dal – recipe

Yummy Matar ki dal

Yummy Matar ki dal

When my room-mate Rajni said matar ki dal I assumed it is a dish with green peas in some yellow dal. But this turned out to be a recipe I have never heard of. A dal made of green peas and cauliflower and no lentils. It is a recipe from Northern Uttar Pradesh(a region in Northern India). It tastes yummier than it sounds and very healthy too. And the recipe is very easy too. So I am posting it here for you guys to try and enjoy. This dish is prepared by my roomie Rajni. I am just the photographer and the helper here.

Ingredients:

  • Green Peas – 250 gms
  • Cauliflower – 250 gms
  • Onion – 1 big
  • Tomato – 1 medium
  • Garlic – 3-4 cloves
  • Fresh Coriander/Cilantro – quantity as desired
  • Ginger – a small knob
  • Green chilli- 2 medium
  • Dry Mango Powder – a pinch
  • Turmeric powder – a pinch
  • Bay leaf – 1 leaf
  • Cloves – 2-3
  • Black Cardamom – 1
  • Cinnamon – a small stick
  • jeera – for tadka
  • Salt – to taste
  • Mustard Oil – for frying

Method:

  • Blanch the peas and cauliflower. Set some peas aside and make the rest into a fine paste.
  • Make a paste of other ingredients as well i.e. Onion, tomato, chillies, garlic, ginger, cilantro.
Fresh ingredients. Replace the frozen peas with fresh ones for better taste

Fresh ingredients. Replace the frozen peas with fresh ones for better taste

Boil the peas for 2-3 mins.

Boil the peas for 2-3 mins.

Blanch the cauliflowers

Blanch the cauliflowers

Make a paste of the green peas

Make a paste of the green peas

  • In a frying pan, heat mustard oil, add jeera and the garam masala i.e. cloves, bay leaf, cinnamon and black cardamom.
  • Then add the onion paste and sauté for a minute or two. Add the green peas paste now and sauté for another minute.
  • Now add the rest of the peas and the cauliflower and fry for some time.
  • Add turmeric powder, salt, dry mango powder and any other dry masala that you’d like to add to this.
Fry all the pastes before adding the peas and cauliflower

Fry all the pastes before adding the peas and cauliflower

  • Add water to this and close the cooker. Let it cook for about 3-4 whistles.
Add peas and cauliflowers and fry. Then add desired amount of water.

Add peas and cauliflowers and fry. Then add desired amount of water.

After the pressure is released, you have your hot dal ready to be served. Garnish it with fresh coriander leaves and serve it with hot rice.

Serve the hot dal with some hot basmati rice, fresh salad and some hot-n-tangy chutney

Serve the hot dal with some hot basmati rice, fresh salad and some hot-n-tangy chutney

I hope you like trying this recipe and eating it as much as we did.

Bajra Roti

Bajra Millet

Bajra Millet

After registering for the Marathon, I decided to eat healthy but cornflakes or plain oats aren’t my kind of food. I’ll go for poha, idli, upma any day (Of course they need to be prepared nicely not the hostel-food kind).  So I started looking for other options and that reminded me of bajra rotis which are usually prepared around Sankranti time. They are an awesome food esp during winters.

One thing I totally love about the healthy food fads is millets are back in style. Bajra/Pearl millet/ಸಜ್ಜೆ is one of them. It is a gluten -free grain and comes with a plenty of other benefits.

Here is how to make some tasty rotis. They are made the same way as Jowar/Sorghum rotis. For better pictures and a more detailed recipe check this out and just replace jowar with bajra. In this recipe, I have added some jowar with bajra and also some more spices to make the roti tastier.

Ingredients:

  • Bajra atta – 1/2 cup
  • Jowar atta – 1 tbsp
  • salt – to taste
  • red chilli powder – to taste
  • turmeric – to taste
  • white sesame seeds/till – to taste
  • Hot water for kneading the dough
Ingredients

Ingredients

Method:

Bring the water to boil.

Bring the water to boil.

Start kneading with the spoon. You can use your hands and cold water once you add hot water and mix

Start kneading with the spoon. You can use your hands and cold water once you add hot water and mix

  • Don’t put all the water at once. Keep adding a little every time. Also, use a spoon to mix the water as it is very hot.
knead the dough properly to get nice rotis

knead the dough properly to get nice rotis

Take a small portion of the dough and make it into a ball

Take a small portion of the dough and make it into a ball

Use a rolling pin or flatten the roti using your hands

Use a rolling-pin or flatten the roti using your hands

Once rolled out, put it on hot tava. Make sure the tava is hot for good rotis

Once rolled out, put it on hot tawa.

  • Make sure the tawa is hot for good rotis. In the next few seconds, as the roti gets a little dry, use a clean muslin cloth and apply a thin layer of water on the upper surface.
  • Let it remain till water evaporates a little and flip it over and press slightly with a soft cloth to make sure it is done properly on all sides.
Roti flipped over

Roti flipped over

You can eat it with any subzi, but I can’t wait these rotis so I am eating it right away with cucumber slices, sprouts, channa dal/ಪುಟಾಣಿ chutney and awesome curd.

Hot bajra roti ready to eat :)

Hot bajra roti ready to eat 🙂

Methi Palak Paratha

Methi Palak Paratha

Methi Palak Paratha

Methi Paratha and Palak Paratha are favorites at home. But I had not tried a combination before. I got this recipe for vinicooksveg and folks at home loved it. Only I did not add Fennel seeds and lemon juice and also decreased the quantity of coriander leaves. She has used yoghurt to knead the dough but I just added about 3 tbsp of yoghurt and used water to knead the dough. I don’t think she used hing, you can skip it too but at my place nothing can be prepared without hing.

Again this is tasty, healthy and easy to make and a great breakfast option.

Hail the greens!

Ingredients:

Methi/Fenugreek leaves(chopped) – 1 bunch medium
Palak/Spinach(chopped) – 1 bunch medium
Coriander leaves(chopped) – a few(you can increase the measure to 1 cup if you wish)
Whole wheat flour – 3 bowls
Chick pea flour/besan – 3 tbsp
Cumin seeds – 2 tsp
Asafoetida/ Hing – pinch
Ginger paste – 1 tsp (I used fresh ginger)
Garlic – 4 pods
Green chilli – 4 medium
Yoghurt – 3 tbsp
Coriander powder – 1 tsp
Garam Masala – 2 tsps
Water – to knead the dough
Salt – to taste
Oil – 2 tsp to knead the dough, 2 tsp for green leaves & the rest to fry the parathas.

Method:

  • Grind the ginger, garlic and green chilli with salt to make a paste
Green Chilli, ginger & garlic paste

Green Chilli, ginger & garlic paste with salt

  • Heat oil in a pan and add the cumin seeds to it. As the seeds splutter, add hing and the green chilli paste and sauté for a minute.
Saute the paste and cumin seeds

Saute the paste and cumin seeds

  • Now add the chopped greens.
Greens added

Greens added

  • Saute for a minute and add the coriander powder and garam masala powder. Saute for another two minutes. Remove from the heat and let it cool.
  • Now to the wheat flour add the chick pea flour, salt, yoghurt and greens mix.
Flour to be mixed

Flour to be mixed

  • Knead the dough and let it rest for 20-25 mins.
Dough for Methi-Palak Paratha

Dough for Methi-Palak Paratha

  • Take a ball sized dough and roll it out using a rolling-pin. You can use any of the folding methods to fold the paratha. I made a triangle and rolled them out.
Rolled out

Rolled out

  • Put it on a hot tawa and fry the paratha from both sides.
On Tawa

On Tawa

  • Once fried, serve it hot with any of the paratha accompaniments. We had it the North Karnataka style. Add ತುಪ್ಪ(ghee) and ಪುಟಾಣಿ ಹಿಂಡಿ/ಚಟ್ನೀ( chutney), roll the paratha and gobble it up.
Add ghee and chutney

Add ghee and chutney

Rolled Paratha

Rolled Paratha

Happy Weekend! 🙂

Palak Paratha/ Spinach Paratha – recipe

Palak Lachcha Paratha

Palak Lachcha Paratha

The first time I thought of this dish was on the Irish festival Saint Patrick’s day. To say that we don’t celebrate it here even would mean that people know of this. But my Facebook wall was flooded with green pictures from my friends staying in North-America. Rivers colored green, people wearing green and even rivers dyed green. I wanted something green too. I couldn’t dye a river nearby but surely I could cook something green. Who better than Sanjeev Kapoor for a recipe. His recipe calls for only salt and ajwain but I have added a few more ingredients of my own to get a different taste in paratha. Hope you like it.

Goes without saying, it is healthy, wholesome and green :P. I have paired it with green coconut chutney to suit the green theme. You can have it with pickles, sabzi, curds or just a thick layer of butter. Also, the method used here for folding the parathas makes it a lachcha paratha. You can use any style you prefer.

This requires you to make blanch the palak/spinach. Blanching enhances the color and the flavor of the spinach and also makes it soft. After blanching, grind and make a paste of the spinach.

Ingredients :

Spinach/Palak – 1 small bunch
Whole wheat flour – 2 cups
Cumin seeds – 2 tsp
Ajwain/carom seeds – 2 tsp
Red chilli powder – 1 tsp
Till/ White sesame seeds – 1 tsp(optional)
Garam masala powder – 1 tsp
Salt – to taste
Milk – to knead the dough

Method:

  • Blanch and grind the Spinach to make a paste.
  • Add all the dry ingredients with the dough and mix them well. Later add the Spinach paste to it and mix.
Ingredients for palak paratha

Ingredients for palak paratha

  • Use milk to knead the dough. And let it settle for 20-25 mins.
Dough

Dough

  • Pinch a ball-sized dough and flatten it and start rolling it out using a rolling-pin
Ready to be rolled out

Ready to be rolled out

Rolled out

Rolled out

  • Once rolled out now sprinkle a bit of flour and oil on the paratha. And start to fold it in the Japanese fan style. Then fold it to make it round. Sorry I couldn’t describe it any better. Please see the pics to get an idea.
Folding the paratha

Folding the paratha

Japanese Fan

Japanese Fan

Fold it to make it round

Fold it to make it round

Lachcha paratha - Ready to be rolled out

Lachcha paratha – Ready to be rolled out

  • Now roll it out again using a rolling-pin. I couldn’t get the round shape. Swalpa adjust maadi(Please adjust). Knowing I couldn’t get a circle even with a compass in hand, I keep my expectations low w.r.t the shape 😛
Rolled out

Rolled out

  • Put the paratha on a hot tawa.
Paratha on tawa

Paratha on tawa

  • Fry the parathas with oil/ghee by flipping and frying on both sides. Once done, take it out and serve hot 🙂
Palak Lachcha Paratha

Palak Lachcha Paratha

Avalakki/ Poha – recipe

Avalakki

Avalakki

ವಗ್ಗರಣೆ ಅವಲಕ್ಕಿ/Avalakki/Poha/beaten rice/flaked rice is a very popular breakfast in North-Karnataka and my all time favorite. I can eat poha all most everyday. It is light, healthy, quick and tasty.

Beaten rice is available in three types here. Thin,Medium and Thick. For this recipe, you will need the medium variety. In case you don’t find it then you can use the thick variety only you will have to wash the poha a little longer. This particular recipe is also called kanda poha(kanda=onions). You can also prepare it with potato which is called aloo poha. You can add fresh seasonal ingredients like green peas, fresh green chickpeas. You can also add tomatoes but we prefer it without them. What I have given is the way it is usually prepared at my home.

Ingredients:

Poha/ Beaten rice/ medium variety – 400 grams/ about 3 cups
Mustard seeds – 1 tsp
Asafoetida/hing – a pinch
Onions(chopped) – 2 small
Curry leaves – a few
Green chillies(chopped) – 2 medium
Peanuts(dry roasted) – 1 tbsp ( non roasted is ok too)
Turmeric powder – 1/2 tsp
Oil – 5 tbsp
Sugar – 1 tsp
Salt – to taste
Lime juice – 1 1/2 tsp
Fresh Coriander leaves/Cilantro – 2 tbsp

Chopped fresh ingredients

Chopped fresh ingredients

Method:

  • Wash the poha in a colander. Make sure it is soft and not mushy. Which is why we don’t take the thin variety for this.
Washed Poha in colander

Washed Poha in colander

  • To this add sugar, salt and lime juice and mix lightly.  Keep it aside.
  • Heat oil in a pan and add mustard seeds.
  • Once the mustard seeds splutter, add hing, curry leaves and sauté. If the peanuts are not roasted add them now.
  • Add the onions and sauté for a minute.
  • Now add green chillies and roasted peanuts, turmeric powder and sauté till the onions are done.
Poha vaggarane

Poha vaggarane

  • Add the poha that was kept aside and mix well. Garnish it with fresh coriander and serve it hot. You can also have it some sev or potato chips or South Indian style with some green coconut chutney.
Poha/ Avalakki

Poha/ Avalakki

Happy Friday! 🙂

How to make Jowar Roti

Jowar/Sorghum

Jowar/Sorghum

Millets have been a part of Indian diet for thousands of years and the health benefits are well-known. If you didn’t here are a few benefits for you.

    • Gluten-free and non-allergic
    • Higher in nutritional value than wheat, especially phosphorus and iron
    • Non-acidic or alkaline and easy to digest
    • Jowar is a rich source of Vitamin B-complex
    • High protein content from 9% to 13% ( For all the meat-eaters who wonder where do vegetarians get protein from)
    • Improved calcium retention as compared to rice
    • Easier to digest
    • Sorghum is rich in phytochemicals including tannins, phenolic acids and anthocyanins. Studies have shown that sorghum can reduce the risk of certain types of cancer in humans. The phytochemical levels are so high in this millet that they have shown potential usefulness in reducing obesity as well.
    • So heart-healthy as well 🙂

Apart from jowar/sorghum/ಜೋಳ, the other popular millets found in India include pearl millet(bajra)/ಸಜ್ಜಿ and ragi/ರಾಗಿ. There is also foxtail millet/ನವಣಿ which isn’t that popular but healthy nonetheless.

Jowar roti/ಜೋಳದ ರೊಟ್ಟಿ/ಬಿಳಿ ಜೋಳದ ರೊಟ್ಟಿ  is a staple food in North-Karnataka and parts of Maharashtra. Jowar roti is unleavened flat bread made from jowar/sorghum. This doesn’t need any oil adding to the benefits above. It requires some skill( a little more than my skill level) to make soft and even rotis. So I happily clicked away while my Mom made them.

Ingredients:

Jowar flour – 1 cup
Water – to knead
salt – to taste

Method:

  • In a small vessel take about 1/2 cup water and bring it to boil. Make sure the water is boiling and not just warm. Not sure if you can see the bubbles rising in the pic.
Boiling water

Boiling water

  • In a shallow wide pan, take the flour and mix salt. Keep it ready to mix water as shown below
Flour in the pan

Flour in the pan

  • Now add the hot water into the dough. Do not add all the water at once. Add only about half and keep adding as you knead. Also, use a spoon to mix the flour as you will be adding hot water. Hot water is required as there is no gluten in jowar. This is known as jigatu/ಜಿಗಟು in kannada.
Adding hot water to knead

Adding hot water to knead

  • Once you have mixed it you can start using your hands to knead and add more water at room temperature if you need to add more. The dough will look something like this.
Jowar roti dough

Jowar roti dough

  • This does not need to be kept aside for settling. In fact, the rotis need to be made right away else you might have difficulty rolling them out later. Now pinch a round big ball sized dough to prepare rotis.
dough balls ready to be flattened

dough balls ready to be flattened

  • To make the roti you should press/beat the circular dough with the palm of your hand on a flat surface such as the rolling board or your kitchen platform. Initially use the right hand to beat it in the form of a circle and use the left hand to maintain a circle. Once it becomes big you can use both hands to beat it to make it thinner. You could also a rolling pin but make sure you roll it out lightly. Traditionally it is made with hands.
Making the roti

Using the hands to make roti

Thin Roti ready to be put on tawa

Thin Roti ready to be put on tawa

  • Heat the tawa well and put the roti on the tawa. In the next few seconds, as the roti gets a little dry, use a clean muslin cloth and apply a thin layer of water on the upper surface.
Applying a thin coating of water

Applying a thin coating of water

  • Let it remain till water evaporates a little and flip it over and press slightly with a soft cloth to make sure it is done properly on all sides.
Jowar roti

Jowar roti

This can be served with any dry/gravy vegetables. The favorite traditional combinations though are Jhunka,stuffed eggplant/brinjal,hesaru kaalu/green moong pallya, shenga hindi and kosambari. Had to take this pic from the Internet as I forgot to take a pic before serving. Very soon I will replace this with one at home.

Jolada rotti with side dishes

Jolada rotti with side dishes

The thali shown above with rice is a complete meal. It is called as rotti meals or Joalda rotti thali here.

Diwali Special at home – Pithiwali Puri

Akash Butti

Akash Butti

Diwali is the time of indulgence. And what better way to start indulging than a sumptuous breakfast in the morning. Happy Diwali all again and here are pics of akash butti/kandil/lantern at our home and a rangoli near our home. Dazzling lights and colours, one can’t ask for more. Add to that sweets, gifts and loads of new stuff. 🙂

Rangoli

Rangoli

Pithiwali Puri is urad dal stuffed puri. Found this recipe from Sanjeev Kapoor’s Khanakhazana.

I definitely wouldn’t put this in the healthy category but amazingly tasty yes. If you are calorie conscious this is not for you. But you can indulge once in a while. As they say if you are not committing any sins, you are probably not having a lot of fun.

Ingredients for the dough:

Whole wheat atta – 1 1/2 cup
All purpose flour – 1/2 cup
oil – a little oil in the dough makes it soft
salt – to taste
water – for kneading

Ingredients for the stuffing:

Urad Dal/Black gram split – 1/2 cup(soaked for 2 hours and drained)
Ghee – for tadka
Coriander seeds – 1 tbsp
Cinnamon – 1 inch stick
Cumin seeds – 1 tsp
Hing – a pinch
Green Chillies – 2 medium
red chilli powder – 1 tsp
Coriander/Cilantro(finely chopped) – a few leaves
Salt – to taste

Method:

  • Soak urad dal for about 2-3 hrs, drain and keep it aside
Urad dal soaked and drained

Urad dal soaked and drained

  • Knead the dough for puri, cover it with a soft cloth and let it settle for about 20-30 mins.
Puri dough

Puri dough

Heat ghee in a pan, add cumin seeds, hing, coriander seeds and cinnamon and sauté. Add drained urad dal and continue to sauté.

Urad dal in the pan

Urad dal in the pan

  • Now add salt, green chillies, red chilli powder, coriander leaves and mix well. Now remove from heat. Let it cool slightly. Grind the mixture to a coarse powder.
Coarse mixture after grinding

Coarse mixture after grinding

  • Now take a small ball from puri dough and flatten it with your fingertips. Place the mixture in the centre and close it from the edges to make a small ball.
Dough with filling

Dough with filling

  • Now with a rolling-pin roll the ball to a nice round puri
Puri rolled put

Puri rolled put

  • Heat oil in a deep pan and deep fry the puri till golden brown.
Deep fried puri

Deep fried puri

  • Now serve hot puris with hot potato sabzi 🙂
Pithiwali puri with sabzi

Pithiwali puri with sabzi

Bon appetit! 🙂

Spring/Green Onion Paratha – Recipe

One of the best things about paratha is the variety. One paratha place in my area has 99 different types on their menu. You can have it plain, stuff it with one of your favorite veggie, or two veggies or mix them all and call it a mix-veg paratha 🙂 Have also posted beetroot paratha previously. This is one of the many varieties you should try out some time. A spring onion or a green onion paratha.

Spring Onion Paratha

Spring Onion Paratha

Ingredients required:

Finely chopped spring onion(green part) – 1 cup
Finely chopped Onion – 1/2 cup
Wheat atta – 1 and 1/2 cup
Besan/Chickpeas flour – 2 tbsp
Chilli powder – 1 tsp
Garam masala powder – 1 tsp
Cumin seeds – 1 tsp
Salt – to taste
Moong dal(soaked for about 2 hours) [optional] – 1/2 cup
oil – 1 tbsp to knead the dough
Ghee – to fry the parathas
water – to knead the dough

Ingredients for Spring paratha before kneading

Ingredients for Spring paratha before kneading

Method
Mix all the above ingredients and knead it into a soft dough with the same consistency as Chapathi dough. And let it rest for about 30 mins.

Spring Paratha dough

Spring Paratha dough

Pinch out required quantity of the dough to make a small ball. Dust the pinched out ball in wheat flour and roll it out using a rolling-pin to a round shape(or at least nearly round as in my case 🙂 ) . Then sprinkle some flour on it and lightly coat it with ghee/oil.

ball dusted

Pinch some dough to make a small ball and dust it with wheat flour

Roll it out nearly round

Roll it out a little to a round shape( at least nearly round)

Fold it twice to make a triangle.

Spring paratha triangle

Spring paratha triangle

Now roll it out to make a nice paratha.

Paratha rolled out

Paratha rolled out

Heat a tawa and when heated put the rolled out paratha on the tawa and add ghee on one side. When done flip and apply ghee to the other side as well.

Spring Paratha on the tava

Spring Paratha on the tava

Once it is done properly on both the sides take it out and serve it hot with curds or pickle or tomato ketch and some potato chips as I did.

Spring Paratha - ready to serve

Spring Paratha – ready to serve

Happy Eating! 🙂